

How To Install Vinyl Tiles Video
How to Install a Sheet Vinyl Floor
Updated: October. 22, 2022
Use this professional person pattern method to guarantee a perfect fit for your new vinyl floor.
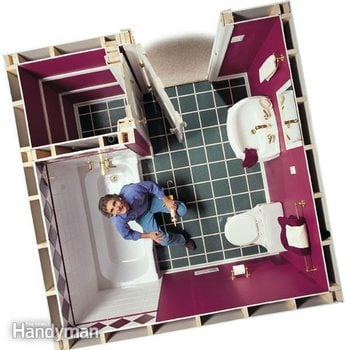
Larn the foolproof "blueprint" method for installing a vinyl floor in your bathroom, with proficient tips for avoiding mutual installation pitfalls.
You might also similar: TBD
- Time
- Complexity
- Cost
- Multiple Days
- Intermediate
- Varies
Prep the former floor to ensure a sound, apartment base
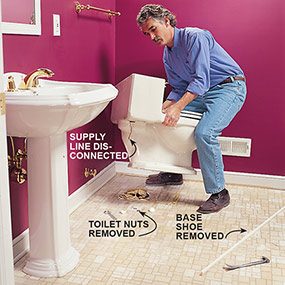
Photo 1: Remove obstacles
Remove the toilet, the base shoe or baseboard molding and the door threshold or carpet strip.
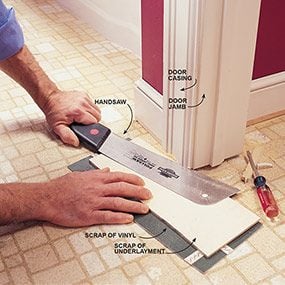
Photo 2: Create infinite for the new flooring to slip under
Saw off the bottom of the door jambs and moldings. Use a chip of the underlayment plywood to agree the saw blade the correct altitude from the flooring. Pick out the sawed-off pieces with a flat-blade screwdriver.
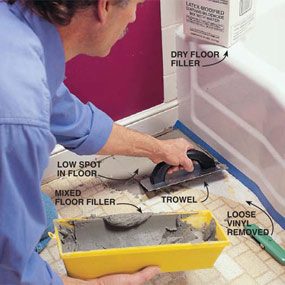
Photo 3: Even out the floor surface
Fill low spots in the old floor with up to 5/eight-in. of floor filler. Mix the filler with water or latex additive as recommended past the manufacturer and trowel over low spots. Apply a straightedge to check the peak.
Vinyl Installation
Information technology all starts with careful floor prep. With the right preparation and adhesive, learning how to install vinyl flooring can be installed over almost any make clean, dry out surface. If you program to install it over concrete, check for excess moisture by gluing downwards a iii x 3-ft. slice of vinyl flooring and taping the edges. After 72 hours, attempt to pull upwardly the vinyl. If it comes up easily, there's also much moisture in the concrete to install a sheet vinyl floor. In some cases, vinyl can exist glued direct to old vinyl, ceramic tile and woods floors, just special fillers and gum-downwardly procedures are needed. Bank check with the manufacturer for specific instructions for these types of installations.
Start past removing the base shoe or baseboard molding and the threshold or carpet strips at the doorway. In a bathroom, remove the toilet and the sink if information technology'south a pedestal (Photo 1). It's usually too much work to remove a vanity cabinet, which isn't difficult to cut around anyway. Even if you're going over the old floor with 1/4-in. underlayment, cut out or reattach loose vinyl and fill low spots with a hardening type of floor filler offset so the underlayment volition prevarication flat (Photo 3).
Photo two shows how to cutting off the bottom of the door trim and jambs so the new vinyl floor volition slide nether them. This is a lot easier than trying to cut the vinyl to fit around the moldings. When you brand the template, slide the square nether the jamb before you mark the paper (Photo v).
Cut a full-size paper template
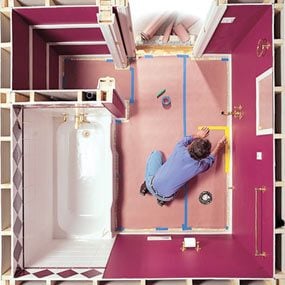
Photo 4: Create a paper template
Tape pieces of heavy paper together to create a template of the bathroom floor. To keep the template from shifting, record it to the bathroom floor. Leave virtually 1 in. of the old floor showing effectually the perimeter. Cut out holes for the pipes and the toilet. Then transfer the shape of the floor onto the paper template by holding a straightedge against the baseboard while you draw a line forth the inside edge.

Photo v: Working around forest trim
Slide the square under the cutoff moldings and door jambs before marking the template.
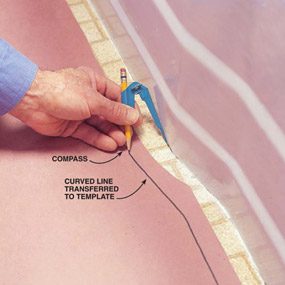
Photo 6: Employ a compass to scribe curves
Scribe forth curved or irregular edges with a compass. Set the distance between the compass signal and pencil equal to the width of the straightedge. Make sure to hold the compass perpendicular to the surface being scribed.
Once the old floor is prepped and clean, you lot're ready to brand the paper template and employ it to mark both the new underlayment and the sheet vinyl for cutting. Any heavy paper volition work for the template. Nosotros used cherry rosin paper, available at well-nigh dwelling house centers.
It'south difficult to make an verbal-sized template, then we're using a technique adult past flooring installers to "scribe" the shape of the room onto the newspaper so transfer information technology dorsum to the flooring (Photos iv and 11). It doesn't matter how wide your straightedge is or how far apart your compass points are set when you lot make the template, as long as yous employ the same straightedge and compass setting when you transfer the marks back to the underlayment and flooring.
Cut and blast down a smooth plywood underlayment
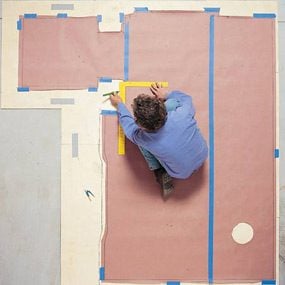
Photograph 7: Tape the paper template to the underlayment
Arrange the one/four-in. underlayment on the floor in the guess shape of the bath floor and tape the sheets together with duct tape. Then tape the paper template to the underlayment.
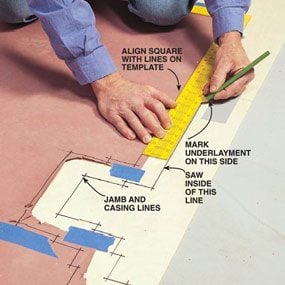
Photograph 8: Mark the underlayment
Transfer the shape of the bathroom floor to the underlayment by aligning the blade of the framing square with the reference line and drawing a line forth the exterior edge. Transfer the curved portions with the compass. Apply a circular saw and jigsaw to cut out the plywood.
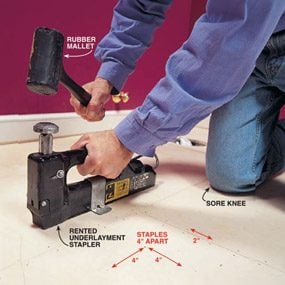
Photo 9: Apply a rented stapler
Staple the underlayment to the bath subfloor using a rented underlayment stapler loaded with seven/8-in. staples. Place staples 4 in. apart in the heart of the sail and 2 in. autonomously along seams and edges.
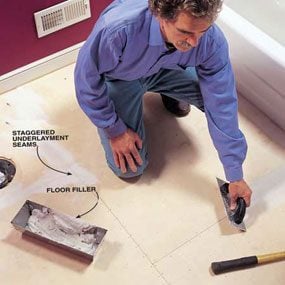
Photo x: Make full gaps and holes
Mix floor filler with latex condiment and trowel it onto the underlayment to make full gaps and holes. Scrape off excess filler after it sets (about twenty minutes). Vacuum the floor, then run a trowel over it to double-check for lumps of filler.
A perfectly smooth surface is essential for a great-looking flooring installation, and the easiest and nigh foolproof method of accomplishing this on forest-framed floors is to install a layer of 1/4-in. plywood underlayment over the existing floor. Lauan plywood used to exist the standard underlayment for vinyl floors, only the pros we talked with complained of unreliable quality. We used a special underlayment course of one/iv-in. birch plywood that was more than expensive, only it'due south amend to pay a little more than to be disappointed by ugly seams or surface defects appearing through the vinyl a few months later. PTS (plugged and bear upon-sanded) plywood too is an adequate underlayment. Make sure the plywood you use is underlayment grade specifically recommended for use under vinyl floors. Photos 7 & nine prove how to mark and staple down the new underlayment.
Many old vinyl floors and the adhesives used with them contain asbestos. Because asbestos tin can be hazardous if it'south disturbed, information technology'south all-time to cover old vinyl floors with 1/4-in. plywood underlayment rather than tear them out. In nearly cases, the additional height won't injure annihilation, and at worst you lot may take to trim off the lesser of the doors, add an extension to the toilet flange or install a reducing threshold at the doorway. If yous must tear out a vinyl floor, contact the U.S. Consumer Product Condom Committee for information on testing for asbestos and guidelines for safe removal. Its website is at www.cpsc.gov.
Before you cut the underlayment, let it acclimate to the humidity in your firm for a 24-hour interval or two. Then adjust the plywood sheets to the approximate shape of your floor and tape them together with duct tape earlier you tape down the pattern (Photo seven). Crude-cut pieces of underlayment to complete the shape if you must; just be sure to go along uncut factory edges together. Plan the installation then the underlayment seams are offset from the seams in the subfloor and are staggered from each other (Photo 10).
Hire an underlayment stapler with a mallet and staple the new 1/iv-in. underlayment downwards with 7/viii-in. staples (Photograph 9). Yous'll demand about 16 staples per sq. ft., spaced as shown in the photograph. Consider renting a compressor and a pneumatic stapler for large areas like kitchens. Drag the flat edge of your trowel over the entire floor, listening for the "tick" of protruding staples. Utilise a hammer to pound in the offenders, and fill the hammer dents afterwards. Don't utilise nails or screws to install the underlayment; whatever filler y'all employ to cover the heads could pop out and cause a crash-land under the new vinyl floor.
Smoothing the surface of the new underlayment is the final step in preparing the flooring for sheet vinyl. Photo x shows how to make full the underlayment. The goal is to create a smoothen surface using the least amount of filler. If the underlayment sheets aren't level at the seams, sand the seams flush with a power sander before filling. Floor filler starts to harden in about five minutes, so don't mix also much at once and be certain to trowel it on quickly.
CAUTION!
Read the label on the adhesive y'all're using. You lot may accept to provide ventilation or apply an approved respirator.
Cut the vinyl to precisely match the template
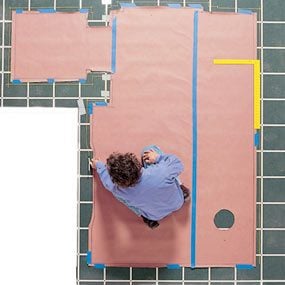
Photo 11: Place the template on the flooring
Unroll the vinyl floor on a clean surface and tap the template to it. If the flooring has a design in it, align the template for the well-nigh desirable layout. Tape the template to the vinyl flooring and transfer the marks with the framing foursquare and compass.
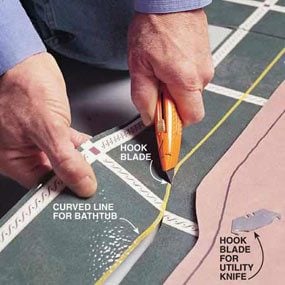
Photo 12: Cut the flooring
Cut out the vinyl flooring using a utility knife fitted with a hook blade.

Photo thirteen: Double-cut the seams
Double-cut the seam by property a straightedge along the desired seam location and cut through both pieces of vinyl with a abrupt utility knife. Keep the knife perpendicular to the floor.
Now that y'all've made the template and installed the underlayment, all that's left is cut out the vinyl and gluing it downwardly. If your vinyl has a symmetrical pattern like ours—false tile, for example—you'll have to decide how to position the template and then the vinyl will have the most pleasing advent when it'southward installed. If yous take to join pieces of the flooring with a seam, first match up the patterns on the two pieces and temporarily record them together. Then tape down the newspaper template, transfer the blueprint, and cut out the vinyl (Photos 11 and 12).
Procedures for cut, assembling and sealing seams vary depending on the type and make of vinyl flooring y'all're using. In Photo 13 we've demonstrated a seaming technique chosen "double cutting," only check with the manufacturer or flooring supplier for instructions on seaming your flooring.
Glue it and roll it for permanent adhesion

Photo 14: Glue down the floor
Spread the agglutinative with a notched trowel. Precisely position the vinyl flooring in the bathroom, then reroll 1 one-half of the piece. Use a notched trowel (1/16 x one/16 x three/32-in. notches) to spread the agglutinative evenly over the floor. Ringlet back the second half of the floor and repeat the gluing process.
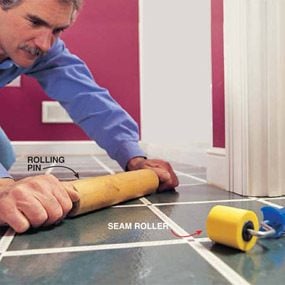
Photograph 15: Press downwards the floor
Press the vinyl tight to the floor with a rolling pin. Piece of work from the middle out. Printing the edges with a wallpaper seam roller.
When you're done cutting out the sheet vinyl, loosely reroll it face in, brushing off any dirt or debris as you get. Unroll it in the room and cheque the fit. Trim if needed, reroll one-half of the slice and spread the mucilage (Photograph 14). Then repeat the process for the other half, get together the seam, and gyre the flooring (Photo xv).
8 Crucial Gluing Tips
- Follow the instructions for "open time" on the adhesive container. That's the fourth dimension between when you spread the glue and when you lay the vinyl down. If y'all put the vinyl downward too before long, bubbling will form as the excess solvent tries to escape.
- Use the exact-sized notched trowel specified, and hold it at about a lx-caste bending to the flooring when you're spreading the adhesive.
- Be careful to spread the agglutinative all the way into corners and nooks.
- Trowel adhesive effectually the perimeter, then fill in the middle with an fifty-fifty coat. Don't leave any extra globs of glue. These will cause bumps in the finished floor.
- Trowel the glue adjacent to the rolled-back vinyl in a direct line and avoid double-coating this area when you trowel the second half. An agglutinative buildup here will announced as a line in the heart of the finished flooring.
- Keep a bucket of warm water and a sponge or rag available, and make clean upward all excess agglutinative immediately. Once the adhesive starts to dry, information technology's very difficult to remove without a special solvent.
- Roll the vinyl as soon as possible later on gluing it down. Use a rolling pin on small floors and a rented flooring roller on large areas. Piece of work from the center out.
- If bubbling remain after you've finished the rolling, exist patient; they'll probably disappear overnight. If they don't, slit the bubbles with a utility knife, flatten them out, and seal the slits with special seam sealer.
A few finishing details and the floor'due south complete

Photograph xvi: Apply caulk
Replace the toilet and reinstall the moldings. Caulk along the bathtub and around the toilet with silicone or latex tub-and-tile caulk.
Finish along the walls by reinstalling the moldings and puttying the nail holes. Then caulk forth the bathtub and other edges not covered with moldings to seal them and keep h2o from getting under the vinyl flooring (Photo 16).
Consummate the job by reinstalling the toilet with a new wax gasket and reconnecting other fitting. Because you raised the floor 1/4 in., you may take to get a longer toilet tank h2o supply tube. The braided stainless steel version works slap-up.
If your vinyl floor abuts carpeting at the doorway, hire a carpet-stretching genu kicker to restretch and hook the carpet onto a new metallic carpet threshold strip. Wood, carpet or tile floors require dissimilar types of thresholds. Ask your flooring supplier for aid choosing the right one.
Now that you've got a great-looking new vinyl floor, here are a few tips to keep it that fashion. Employ protective pads nether table and chair legs, and avert walking on the floor with high-heeled shoes. Put thin plywood downwardly to protect the floor when you move heavy appliances over it. Clean upwards clay and grit right away, and apply the cleaner and sealer recommended past the manufacturer for routine cleaning and maintenance.
How to Buy Vinyl Flooring
Vinyl flooring is available in either rotovinyl or inlay. Inlay vinyl is made by handful a design of vinyl fries on a bankroll and melting them together. It's somewhat brittle and tough to cutting and seam, and is therefore non recommended for do-it-yourselfers.
The other blazon, rotovinyl, is made past laminating a vinyl pattern between a backing sheet and a clear clothing layer, and is much easier to install. Rotovinyl is bachelor with either a felt or a vinyl backing. The felt-backed version that nosotros're using requires you to spread glue over the entire floor, whereas the vinyl-backed flooring requires only a narrow band of adhesive effectually the perimeter and forth the seams. Nosotros've chosen to demonstrate installation of felt-backed rotovinyl over a new layer of special 1/4-in. underlayment plywood. Installation procedures and adhesives differ for each type of vinyl flooring, and vary from one manufacturer to another, so be sure to get instructions for the type of flooring you choose.
Vinyl floor is available in half dozen- and 12-ft. widths. Y'all'll salvage one-half the toll or more past installing the vinyl yourself. Higher-priced flooring has a thicker wear layer and may accept richer patterns, but fifty-fifty less-expensive flooring will last a decade. Compare the flexibility of different floors past angle a corner of the sample. If the backing breaks easily or the vinyl seems strong, you'll accept a hard fourth dimension installing the floor without tearing it.
Dwelling centers and flooring retailers go along a few rolls of canvass vinyl flooring in stock. You lot'll besides discover samples of flooring that you tin order. Take a dimensioned sketch of your room along and ask the salesperson for assistance figuring the quantity. Check the installation requirements and buy the correct adhesive, seam sealer (if your installation requires a seam), trowel, floor filler and matching caulk.
Required Tools for this How to Install Vinyl Floor Project
Take the necessary tools for this DIY installing vinyl flooring project lined up before you lot starting time—you'll save fourth dimension and frustration.
You will also need a seam roller and a rolling pin.
Required Materials for this How to Install Vinyl Floor Project
Avoid last-infinitesimal shopping trips past having all your materials ready ahead of time before doing vinyl floor installation. Here's a listing.
Originally Published: July xix, 2022

Source: https://www.familyhandyman.com/project/how-to-install-a-sheet-vinyl-floor/
Posted by: abramsinualst.blogspot.com
0 Response to "How To Install Vinyl Tiles Video"
Post a Comment